
This is a complete guide to using your Brieftons 7-Blade Spiralizer. It will help you use the product correctly. Don’t worry, it’s not as complicated as it looks, as you will soon find out!
If you only have 2 minutes, you can get started quickly now by watching the How to Spiralize video.
For answers to other questions that you might have, please check out the rest of the guide.
Quick Links:
Components
Blades
How to Change Blades
How to Get the Spiralizer Ready for Use
How to Spiralize
Possible Vegetable Patterns
Examples of How to Spiralize Particular Vegetables/Fruits
How to Clean the Spiralizer
How to Store the Spiralizer
How to Re-assemble the Spiralizer
For Left-Handed People
Correct Counter Height and Posture
How to Select the Right Produce for Spiralizing
How to Prep Your Vegetable Before Spiralizing
Troubleshooting Issues
What Vegetables and Fruits Work with the Spiralizer?
What Vegetables and Fruits Don’t Work with the Spiralizer?
What Dishes Can You Make With The Spiralizer
Cooking and Storing Spiralized Vegetables
Full Demo Video
Recipes to Get You Started
Components
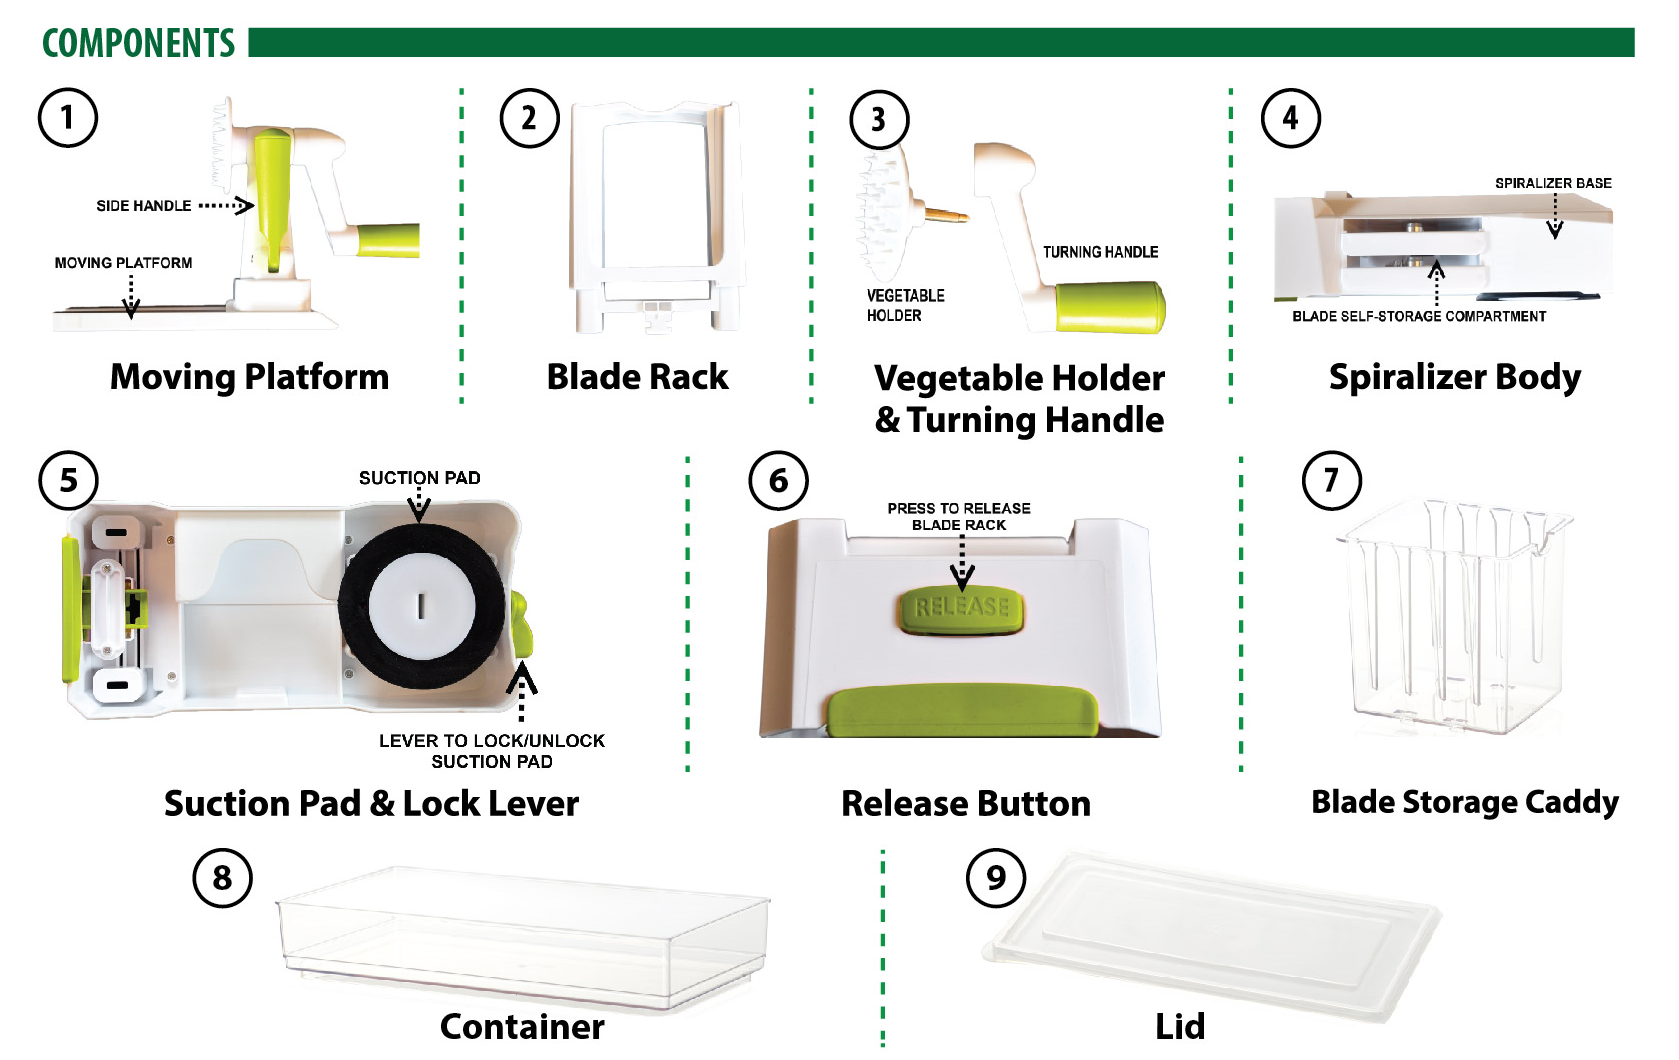
This video shows the components that come with your Brieftons 7-Blade Spiralizer:
Blades
Your spiralizer comes with 7 blades. Out of the box, you should be able to find:
- 1 blade pre-installed in the blade rack (i.e. component #2 above)
- 2 blades stored in the blade self-storage compartment (i.e. component #4 above)
- 4 blades stored in the blade storage caddy (i.e. component #7 above)
The 7 blades look like below…
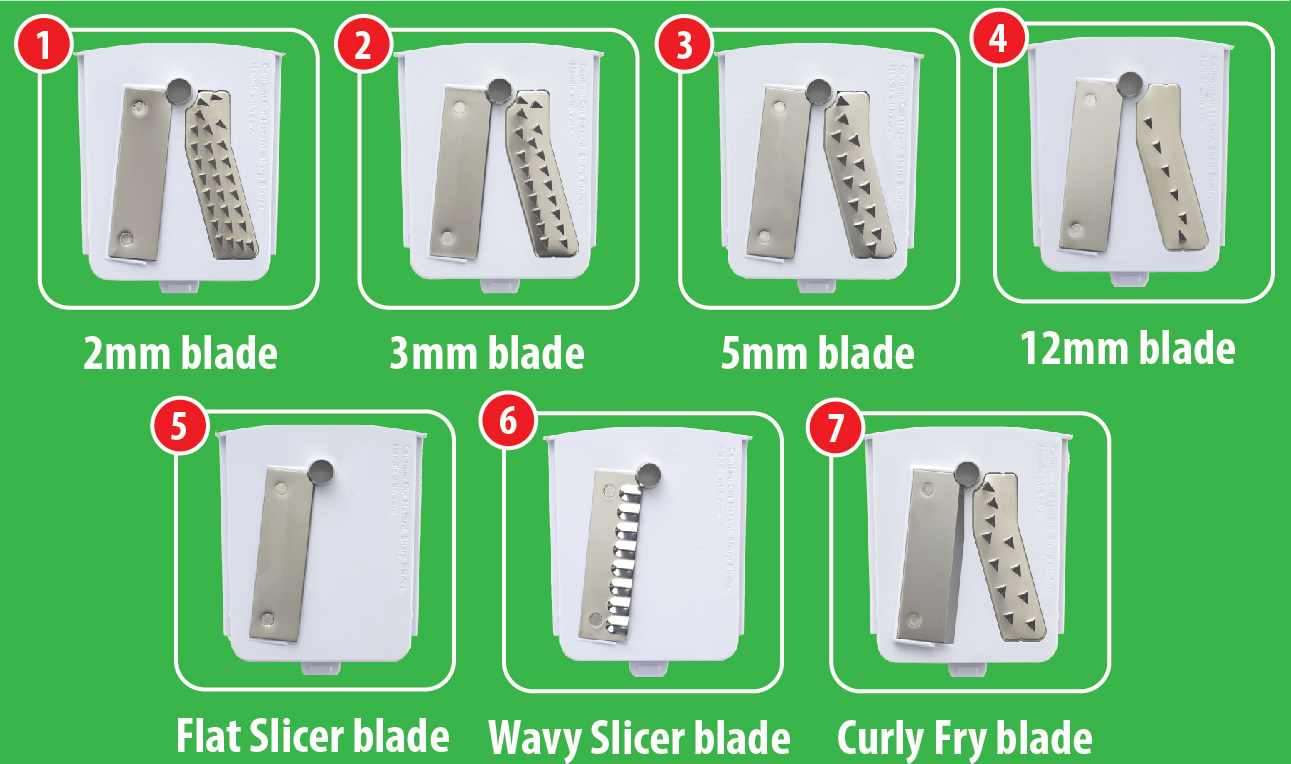
This video shows where you can find all the 7 blades that come with your Brieftons 7-Blade Spiralizer:
How to Change Blades
This video shows how to change/remove the blades:
How to Get the Spiralize Ready for Use
When you take the spiralizer out of the box, please follow the below video to get it ready for use…
The spiralizer will now be ready for use for the 1st time.
How to Spiralize
This video shows how to spiralize vegetables with the spiralizer:
Tip:
To catch the spiralized vegetables as they come out, you can use one of the following:
-
- The provided plastic container
- A plate
- A low bowl
- A cutting mat
- A piece of aluminum foil. You may want to gently roll all edges slightly inward to form edges to contain juice and spiralizing bits.
Possible Vegetable Patterns
This video shows the possible types of cuts you can achieve with the spiralizer:
Due to the large number of vegetables that the spiralizer can be used for, it’s not possible to have a definite list of vegetables that should be spiralized for each blade. However the general rules of thumb are:
- Softer vegetables can use any blade
- For harder vegetables such as sweet potato or butternut squash, we recommend the use of a bigger blade e.g. 5mm or 5.5mm blades. This is because a smaller blade will have more blade teeth which may cause more resistance when used with a harder vegetable
- Vegetables with layers or a hollow inside e.g. onions, cabbages, bell peppers should use the Flat blade
Examples of How to Spiralize Particular Vegetables/Fruits
Most vegetables can be spiralized the same way. However, please follow the following suggestions if you are spiralizing any of the below-mentioned vegetables/fruits…
Apple
Cut off the top, cut off the bottom, and stick the middle part, which is the core of the apple, right on the round steel spindle of the spiralizer. The apple core will be gone in no time. Spiralized apples are great for use in salads, savory dishes and desserts. Spiralized apple will turn brown really quickly so it’s best to use them immediately or dress them with lemon juice.
Artichokes
Large artichokes work best. It’s not necessary to peel them. If you are not using the spiralized artichokes immediately, it’s best to place them in a bowl of water with some lemon juice to prevent them from discoloring.
Beetroot
There’s no need to peel fresh beetroot. Just wash the skin, flatten the ends and spiralize whole. They can be had raw in salads or baked into tasty beetroot crisps.
Bell Pepper
Bell peppers are a little trickier. It’s best to cut off the top and place the open end on the edge of the flat blade, and attach the bottom side to the handle, before spiralizing it.
Broccoli
Don’t throw away broccoli stems, as they can spiralize really well using the smaller blade sizes. For best results, stir fry or steam the spiralized broccoli stems.
Butternut Squash
To avoid the seeds, you should only use the non-bulbous end of the squash. Cut any really long strands of spiralized squash into smaller pieces using scissors, as that will make the spiralized squash easier to eat.
Cabbage
Cabbage is already in layers by nature, so make sure to use the flat blade. Spiralize as usual and you will have shredded cabbage (coleslaw) in no time.
Carrots
Choose large carrots for spiralizing for best results. Eat spiralized carrots raw in salads, or steam carrot ribbons to create a delicious accompaniment.
Celeriac
Use a sharp knife to remove the knobbly bits from the celeriac, peel it, then cut it in half, and trim to create 2 flat ends. Spiralized celeriac works well in gratins, soups and remoulade.
Cucumber
Cucumbers are easy to spiralize, however there’s one issue: the juice. Just spiralize it as usual, then let it sit for a while so that the juice can drain out. Or you can pat the spirals or ribbons dry with a piece of paper towel. Cucumbers make beautiful ribbons for use in salads.
Onions
Onions are already in layers by nature, so make sure to use the flat blade. Spiralize as usual and you will have piles and piles of thinly sliced onion rings in no time. You can use spiralized onions to replace chopped ones in recipes, or turn them into onion bhajis and crispy onion spirals.
Parsnips
Choose large fat parsnips for best results. Add them to a rosti or make parsnip crisps.
Potatoes and Sweet Potatoes
Prepare potatoes or sweet potatoes by peeling them, trim the 2 ends and cut in half widthways if they are very large. Sweet potatoes are great for adding colors to any dish.
Swedes
Peel off the skin, then cut into large chunks with flat ends to attach to the spiralizer. They can be used in fritters or mixed with potatoes as a topping.
Zucchini
Spiralized zucchinis make perfect zoodles. It’s easiest to cut the zucchini in half first before spiralizing it. They can be eaten raw or very lightly steamed, boiled or stir fried.
How to Clean the Spiralizer
This video shows how to clean the spiralizer after use:
General Cleaning Tips
- Wash the spiralizer under running tap water. Use a mild detergent if necessary. Use a brush to clean between the blade teeth if necessary.
- Hand washing is recommended to prolong the life of the product.
- If washed in a dishwasher, use the top rack only, as hot water can warp the suction pad and prevent it from working correctly.
Preventing Stains
Unfortunately stains from vegetables such as carrots/beets are a relatively common issue with plastic products of this nature. Sometimes carrots/beets may leave stains on the spiralizer’s plastic. The best thing to do is to prevent it from happening in the first place, as follows:
- Spray some vegetable oil on the plastic (where the plastic may come into contact with the vegetable). This will make it much harder for carrots/beets to stain the plastic.
How to Remove Stains
When stains happen, please try one of the 2 methods below to remove the stains:
- The easier method: Use baking soda to clean the stain.
- The most effective method: Mix a paste of baking soda and dish soap, scrub it on the stain, let it sit for 20 minutes, scrub it again, and rinse it thoroughly. Repeat as necessary until the stain is removed.
How to Store the Spiralizer
Depending on the space available in your kitchen, you may choose to store away the spiralizer (when not in use) using one of the 2 methods below.
Method 1 – Store it as a single unit
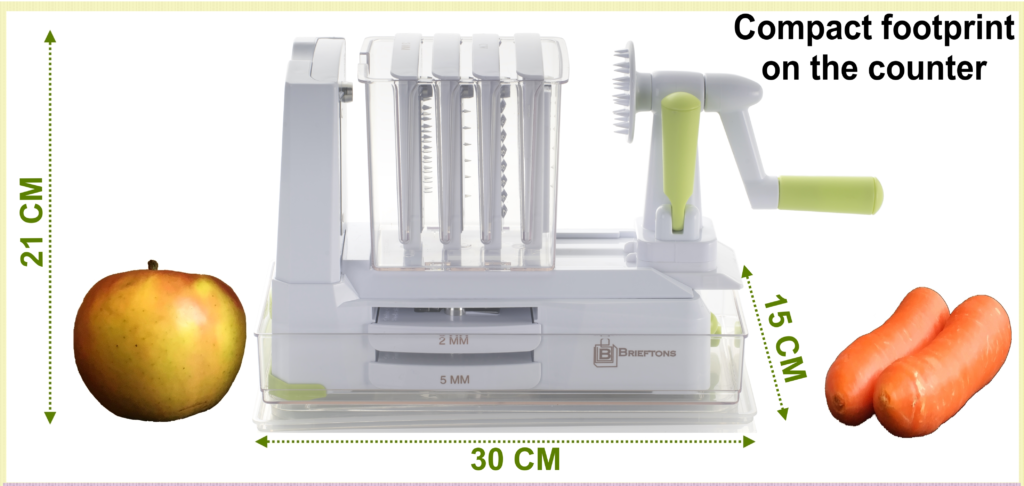
The spiralizer is designed to be stored neatly and safely as a single unit, ready to go whenever you want to use it again.
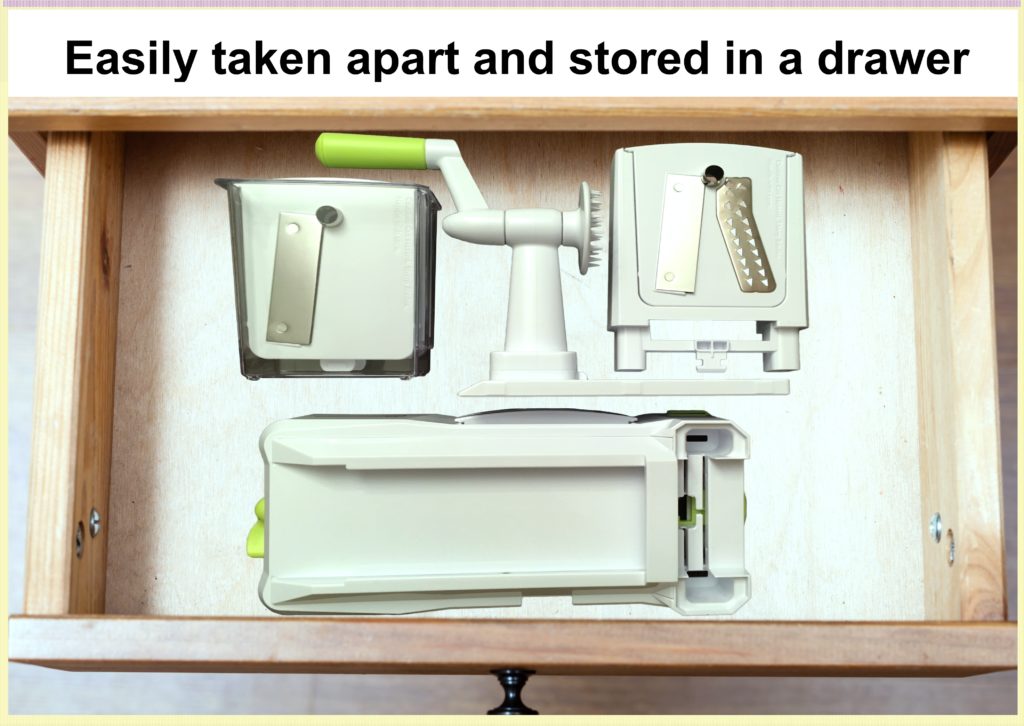
Method 2 – Store it as individual parts in a drawer
If vertical space is an issue, you can always take the components apart and store them all in a kitchen drawer.
Please watch this video to see how to store the spiralizer either as a single unit, or as individual parts in a drawer:
How to Re-assemble the Spiralizer
The product comes pre-assembled and ready to use. However you may want to take it apart to clean the individual components, or to store the product away more compactly. To re-assemble it, please follow the instruction in this video:
For Left-Handed People
If you are left handed, fear not! You can still use the spiralizer to achieve equally great results.
This video shows how to do that with an earlier version of the spiralizer, however the concept is the same:
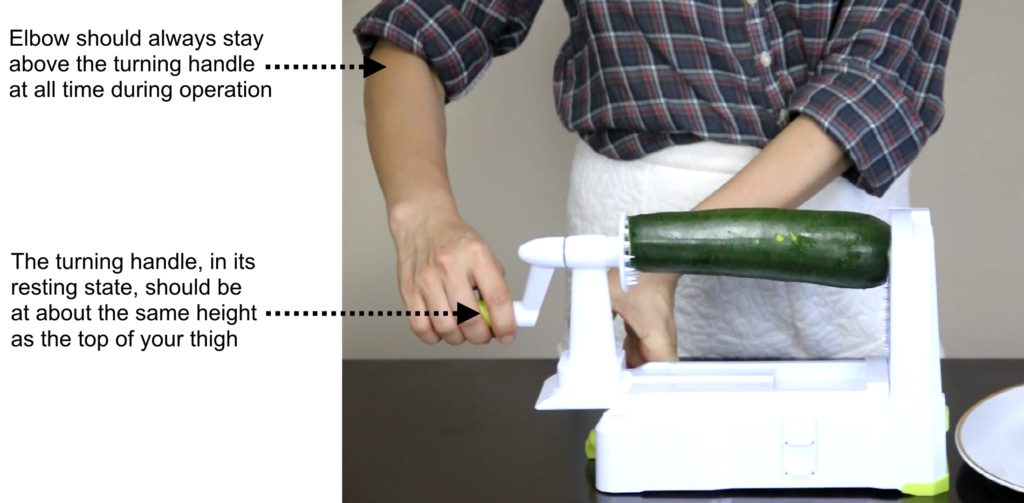
Correct Counter Height and Posture
When using the spiralizer, make sure that you place it at the correct counter height, as that will allow you to have the correct posture to operate the spiralizer effectively without having to exert too much physical strength.
You will know that you have the correct posture when:
- The spiralizer’s turning handle, in its resting state, is at about the same height as the top of your thigh.
- The turning handle does not rise above your elbow at any point while you turn it to operate the spiralizer.
If your counter is too high, you may want to stand on a stable stool/chair to achieve the correct posture.
How to Select the Right Produce for Spiralizing
Produce selection is paramount for the machine to work correctly.
- Use produce at its peak for the best results.
- Choose thick, firm, straight vegetables that are at least 2.5 inches long and 1.5 inches in diameter. If the vegetable is too thin or curvy, it will result in many half-moon shapes.
- It is important to purchase FIRM (not soft) zucchini, and not “jumbo” ones that tend to have a lot of seeds. If purchasing cucumbers, FIRM English Cucumbers work best. You want to purchase produce that is shaped like a log and straight (not curved).
- The inside of the vegetable must be solid (no hollow cores), with the exception of bell pepper.
- Juicy fruits like oranges, pineapples, etc. cannot be spiralized.
How to Prep Your Vegetable Before Spiralizing
- Remove the core from fruits with a hard core e.g. apples and pears.
- Trim the ends. Make sure your cuts are as straight and even as possible.
- Remove the peel from tough root vegetables and butternut squash. Also if the skin is inedible, remove/peel it first. Zucchini, potatoes and apples do not need to be peeled.
- Try microwaving large, firm root vegetables like rutabaga to make them easier to cut. Microwave peeled vegetables for 2 minutes, rotating halfway through.
Troubleshooting Issues
Here are 2 most common issues that can usually be addressed quickly by following the below tips…
Not Getting Consistent, Long Strands from Your Veggies?
If you are not getting consistent, long strands from your veggies, please make sure to follow all the instructions below:
- Make sure to place the vegetable straight in the middle of the vegetable holder, so that it does not lean heavily toward any particular side.
- If your vegetable has a narrower end, place that end on on the round spindle, and the wide end on the vegetable holder. Make sure it’s centered!
- Apply a consistent forward pressure to the turning handle while rotating it, which will ensure the vegetable will come into constant contact with the blade. You may need to use more pressure when spiralizing narrow or firm veggies like carrots or butternut squash.
- For vegetables with a skin, peeling the skin off will make it easier to spiralize them.
- For harder vegetables, microwaving or pre-boiling them quickly first will make it easier to spiralize them.
- If you notice when spiralizing that only half-moon shapes are coming out, reposition the veggie on your spiralizer. This happens mostly when the veggie moves off center. Another tip to avoid half-moons is to make sure the ends of your veggie are cut flat/straight.
Having an Issue with Your Suction Pad?
The suction pad is designed to be able to stick to flat, even, non-porous surfaces for hours. The best surfaces for it are granite, quartz, glass, metal. If it doesn’t stick well, please do the following:
- Ensure the suction pad’s lever is turned counter-clockwise all the way to the left. Only stop when the tip of the lever touches the counter surface.
- Check the black rubber seal at the bottom. If it’s malformed in any way, try taking a warm washcloth to it to soften and reshape it, and try twisting it around a little to make it flat/even again.
What Vegetables and Fruits Work with the Spiralizer?
- Produce that is thick, firm, straight, at least 2.5 inches long and at least 1.5 inches in diameter. Bagged carrots are usually not thick enough. Choose loose carrots as they tend to be wider.
- Possible vegetables are apples, Asian pears, beets, broccoli stems (only fat ones), carrots (only fat ones), celeriac, chayote, cucumbers, daikon radish, jicama, kohlrabi, onions, parsnips, pears, bell peppers, potatoes, radishes, rutabaga, sweet potatoes, turnips, watermelon radishes, winter squash, zucchini and other summer squash.
What Vegetables and Fruits Don’t Work with the Spiralizer?
- Produce that is narrow, like celery or thin carrots.
- Produce that is soft or juicy. The produce will give and fall apart or squish as it is pushed against the blade. Eggplant might seem firm, however the flesh has a spongy texture which will not stay intact when turned on the spiralizer, and it will tear. Pears will work if they are firm, even if they are on the juicy side.
- Produce that is irregular, such as cauliflower and broccoli florets, which are difficult to secure and will fall apart.
- Produce with lots of seeds or one big seed in the middle. The one exception is thick-fleshed bell peppers. You can use the spiralizer for bell peppers, however it’s best to only spiralize a little more than halfway up the vegetable, until the blade reaches the seedpod.
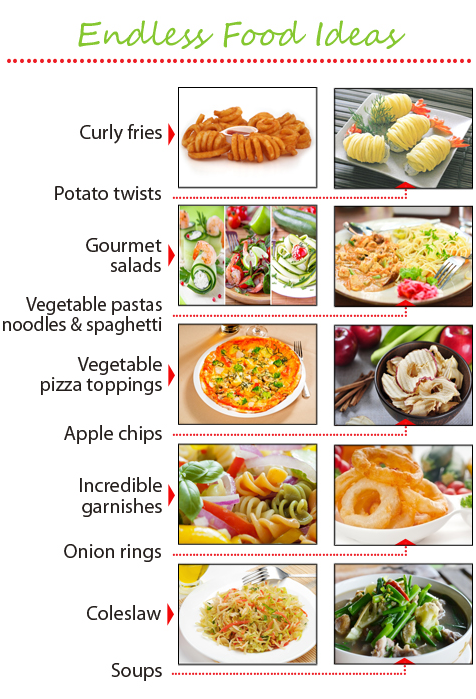
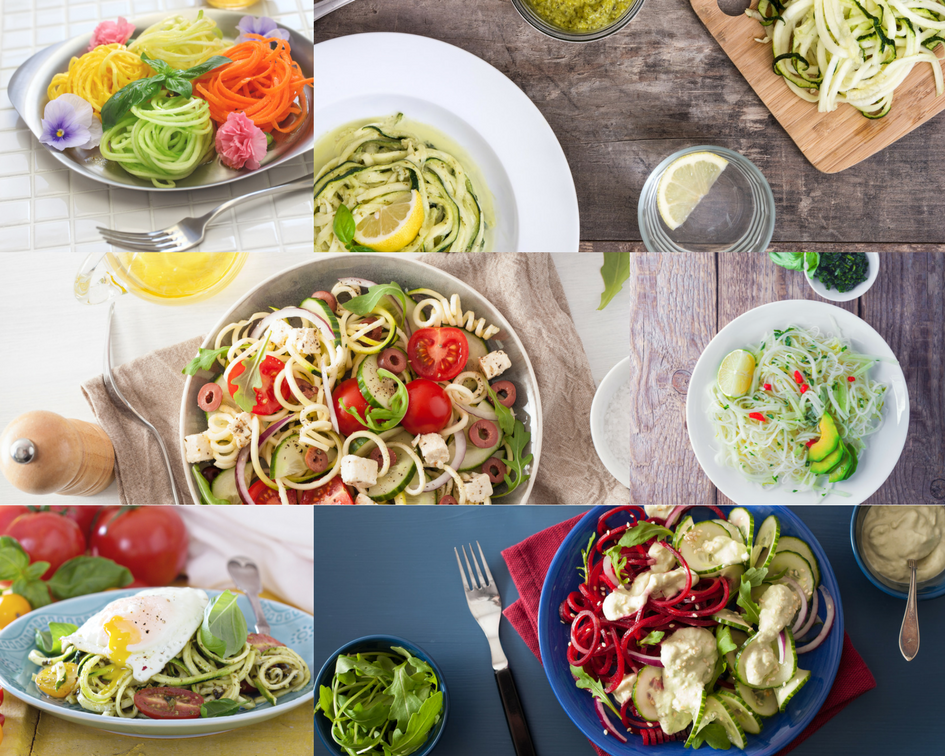
What Dishes Can You Make With The Spiralizer
There are many types of dishes you can make with the spiralizer. For ideas, the Brieftons Spiral Slicer Recipe eBook is a good starting point.
Here are just some examples of what you can make…
Cooking and Storing Spiralized Vegetables
The good thing about spiralized vegetables is they can be cooked really quickly or even eaten raw. The best ways to cook them are usually the simplest:
- Steaming
- Simmering in boiling water
- Stir frying
- Baking and roasting (for spiralized vegetables such as sweet potatoes, potatoes, beetroots, parsnips and butternut squash)
It’s perfectly fine to store most spiralized vegetables in an airtight container in the fridge for 3-4 days. This means you can prep vegetables in advance, or spiralize extra and save the rest for later use. There are some exceptions though:
- Apples, pears and potatoes can oxidize quickly and turn brown, so it’s best to prepare them as and when needed.
- Spiralized cucumber can only be kept for 2 days because of its high water content.
Full Demo Video
Please find below the full demo video of the Brieftons 7-Blade Spiralizer:
Recipes to Get You Started
Have you downloaded your copy of the Brieftons Spiral Slicer recipe ebook? It contains 20 quick, healthy & tasty vegetable dishes that you can make with your spiralizer right away…
Click Here to Get the Brieftons Spiral Slicer Recipe eBook
Got a minute? Tell us (and other shoppers) about your experience with your Brieftons 7-Blade Spiralizer when you leave a product review.
Have questions? Need help? Just contact us via support@brieftons.com and you’ll have our full attention!