
This is a complete guide to using your Multi-Function Food Cutter. It will help you use the product correctly. Don’t worry, it’s not as complicated as it looks, as you will soon find out!
If you only have 2 minutes, you can get started quickly now by watching the demo video.
For answers to other questions that you might have, please check out the rest of the guide.
Quick Links:
Full Demo Video
What Can The Food Cutter Do?
Package Content
How To Get The Food Cutter Ready For Use
Components & Controls
How To Cut Foods
Blade Controls
How To Store
Suggested Fruits And Vegetables
How To Clean
Types Of Dishes That Can Be Made
Cautions
FULL DEMO VIDEO
We recommend that you spend a few minutes watching this demo video, as it will answer many questions you may have about the food cutter…
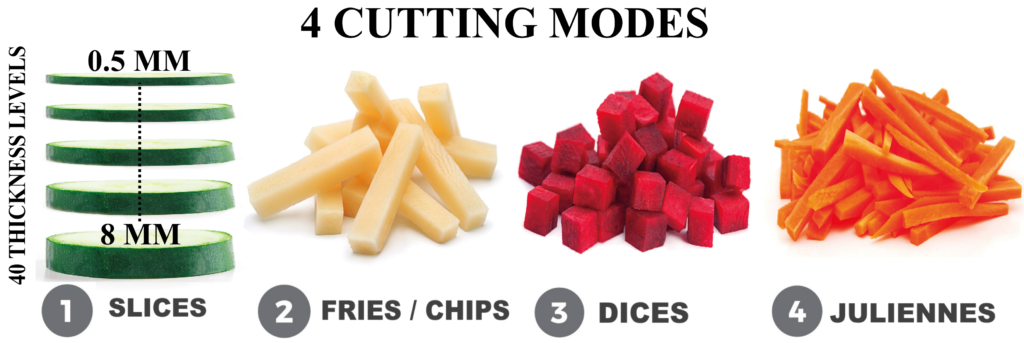
WHAT CAN THE FOOD CUTTER DO?
The food cutter is equipped with 4 cutting modes to make slices, fries/chips, dice, and juliennes from your vegetables/fruits. There are also 40 thickness levels to choose from, ranging from 0.5 mm to 8 mm in thickness.
PACKAGE CONTENT
Out of the box, the Multi-Functional Food Cutter comes with the following parts…

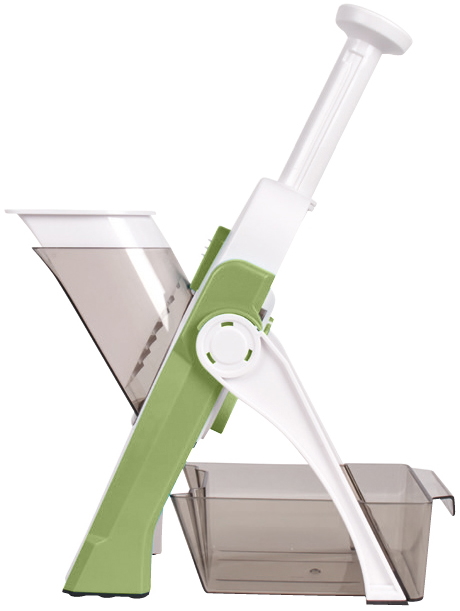
HOW TO GET THE FOOD CUTTER READY FOR USE
Please follow these few simple steps to get the product ready for use:
- Pull out the feet (4) all the way until they lock into position.
- Place the food cutter on a stable, flat surface, and push it down so that the suction bases (9) at the bottom can firmly attach to the surface.
- Turn the handle (1) clockwise to extend it.
- Pull the lock/unlock button (2) up to release the removable blade guard (3), and replace it with the feeder (7). Release the lock/unlock button to lock the feeder into position.
- Put the container (5) at the back of the food cutter, between the 2 feet (4).
The food cutter should now look like below…
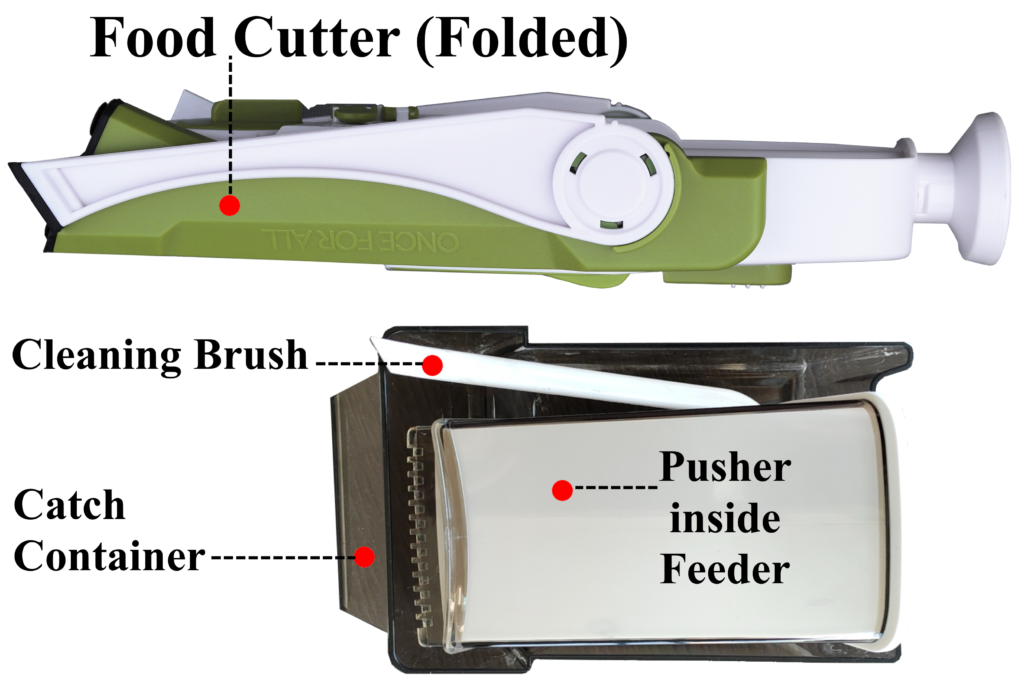
COMPONENTS & CONTROLS
Please familiarize yourself with the various components of your food cutter below.

HOW TO CUT FOODS
The food cutter can perform 4 cutting fuctions, as follows.
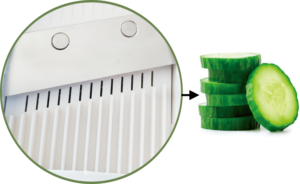
1. Cutting foods into slices
- Put the food into the feeder (7).
- Rotate the thickness regulator (13) to choose your desired thickness.
- Make sure all vertical blades are down. If they are not, use knob 1 and knob 2 to collapse them. Refer to 1.2 and 2.2 in the BLADE CONTROLS section.
- Use the pusher (6) to push the food into the feeder (7), and push the handle (1) simultaneously to start slicing the food.
- Slices will come out from the other end and fall into the catch container.
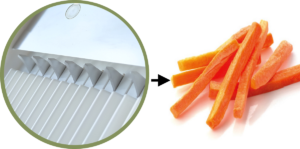
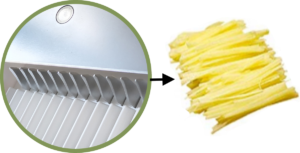
2. Cutting foods into strips / chips / fries
- Put the food into the feeder (7).
- Rotate the thickness regulator (13) to choose your desired thickness. NOTE: It’s best to choose a higher number (i.e. 4 or above) for a thicker setting!
- Make sure only one set of the vertical blades are up. If none is up, use knob 1 or knob 2 (but not both) to raise them up. If all are up, use knob 1 or knob 2 (but not both) to collapse them. Refer to 1.1 and 2.1 in the BLADE CONTROLS section.
- Use the pusher (6) to push the food into the feeder (7), and push the handle (1) simultaneously to cut the food into strips/chips/fries.
3. Cutting foods into juliennes
- Put the food into the feeder (7).
- Rotate the thickness regulator (13) to choose your desired thickness. NOTE: It’s best to choose a lower number (i.e. 4 or below) for a thinner setting!
- Make sure all vertical blades are up. If they are not, use knob 1 and knob 2 to raise them up. Refer to 1.1 and 2.1 in the BLADE CONTROLS section.
- Use the pusher (6) to push the food into the feeder (7), and push the handle (1) simultaneously to cut the food into juliennes.
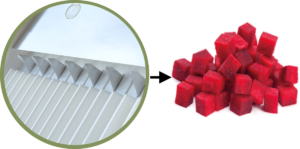
4. Cutting foods into dice
-
- Cut the food lengthwise into slices (as thick as how you want your dice to be).
- Place the slices lengthwise into the feeder (7).
- Rotate the thickness regulator (13) to choose your desired thickness.
- Make sure only one set of the vertical blades are up. If none is up, use knob 1 or knob 2 (but not both) to raise them up. If all are up, use knob 1 or knob 2 (but not both) to collapse them. Refer to 1.1 and 2.1 in the BLADE CONTROLS section. NOTE: For smaller dicing, raise all vertical blades.
- Use the pusher (6) to push the food into the feeder (7), and push the handle (1) simultaneously to cut the food into dice.
NOTE:
- The thickness regulator (13) can set 40 different thickness levels, ranging from 0.5 mm to 8 mm. The lower the number, the thinner the results will be. The higher the number, the thicker the results will be.
- Use the pusher (6) for thin-cutting thicknesses, and for hard foods.
- Larger foods should be cut first into halves or quarters before being cut with the food cutter.
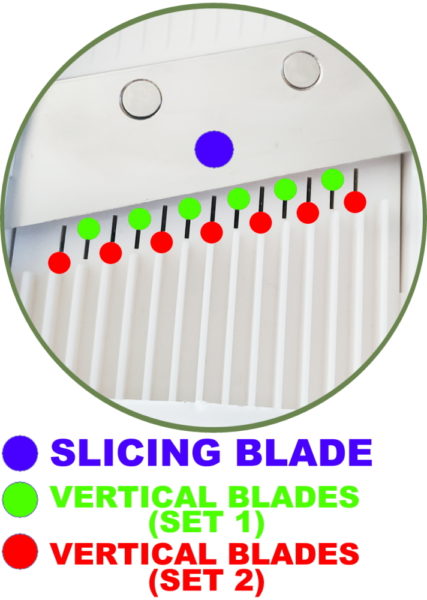
BLADE CONTROLS
There are 2 types of blades employed by the food cutter to perform its cutting functions:
- Multiple vertical blades
- 1 slicing blade
There are 3 control knobs at the back of the food cutter to adjust the blades’ positions, depending on which cutting fuction you want to perform.
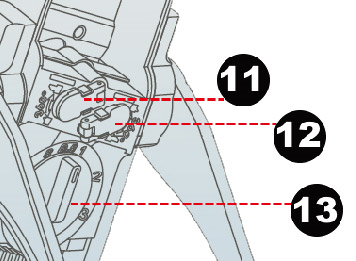
Knob 1 (11)
Rotating this knob moves the 1st set of vertical blades up or down. This is useful for when you want to cut foods into strips, juliennes or dice.
1.1. When the vertical blades are down, rotating this knob 360° clockwise will raise the vertical blades up.
1.2. When the vertical blades are up, rotating this knob 360° counter-clockwise will collapse and hide the vertical blades.
To rotate this knob, simply lift up the green flap, rotate it, then lock it down to secure the vertical blades in the new position.
Knob 2 (12)
Rotating this knob moves the 2nd set of vertical blades up or down. This is useful for when you want to cut foods into strips, juliennes or dice.
2.1. When the vertical blades are down, rotating this knob 360° clockwise will raise the vertical blades up.
2.2. When the vertical blades are up, rotating this knob 360° counter-clockwise will collapse and hide the vertical blades.
To rotate this knob, simply lift up the green flap, rotate it, then lock it down to secure the vertical blades in the new position.
Thickness Regulator (13)
Rotating this knob moves the slicing blade up or down, and thereby control how thick or thin your results will be. This control can be used in conjunction with all 4 cutting functions (Slices, Strips, Juliennes, and Dice)
You can use it to set 40 different thickness levels, ranging from 0.5 mm to 8 mm. The lower the number, the thinner the results will be. The higher the number, the thicker the results will be.
HOW TO STORE
- Collapse the handle (1) by pushing it down and turning it counter-clockwise to lock it.
- Fold the feet (4) by pushing them all the way toward the food cutter’s body.
- Put the blade guard (3) over the blades as a safety measure. Do this by pulling the lock/unlock button (2) up to release the feeder (7), and replacing it with the blade guard.
- Put the pusher (6) inside the feeder. They can then be placed alongside the cleaning brush (8) inside the container (5) for compact storage.
The food cutter, when stored, should be compact as shown below.
SUGGESTED FRUITS AND VEGETABLES
The food cutter works best with firm vegetables like carrots, cucumbers, onions, potatoes, turnips, rutabagas, zucchini, large radishes, squash, beetroots, capsicums, apples, pears, among others. Experiment and have fun!
HOW TO CLEAN
- It is best to clean the food cutter immediately after use.
- Use the provided plastic comb to remove debris in between the pusher teeth and blades.
- It is recommended that the food cutter’s body be handwashed (see instructions below).
- The catch container (5), pusher (6), feeder (7) and blade cleaning brush (8) can either be handwashed or put into the dishwasher (top-rack only).
How to handwash the food cutter’s body
- Fold the feet (4) by pushing them all the way toward the food cutter’s body.
- Remove the feeder (7) by pulling the lock/unlock button (3) up and pulling the feeder out. This will expose the concealed blades (10).
- Turn on your water tap, and position the food cutter such that the blades are directly under the running water. Push the handle (1) repeatedly to push any food remnants away from the blades. Use the provided cleaning brush (8) if necessary to clean between the blades.
- Turn over the food cutter to wash the other side.
- Use mild detergent if necessary.
- Use baking soda to remove stains if there are any.
TYPES OF DISHES THAT CAN BE MADE
You can use the chopper to quickly make consistent and uniform dice from your favorite vegetables/fruits for salads, stir fries, soups, crudities, ragout, stews, desserts and more. Experiment with what it can do. A number of recipe ideas are included in the bonus Brieftons recipe ebooks sent to you after purchase.
CAUTIONS
- This product contains very sharp blades. Use care when operating and washing it to avoid injuries. Not for use by children.
- Wash before first use.
- Do not heat or microwave the device.
Got a minute? Tell us (and other shoppers) about your experience with your Multi-Function Food Cutter when you leave a product review.
Have questions? Need help? Just contact us via support@brieftons.com and you’ll have our full attention!